Work
- Deutsch: Diese Seite ist nicht ins Deutsche übersetzt
The Work module is where inspection work is planned, followed up, and quality-assured. This is where you split a project group's assets into inspection tasks, assign them to inspectors, rebalance work while it is underway, review completed work in QA, and finally approve the project group so its data is published.
The module has three views in the navigation pane: Project library, Tasks, and QA. The QA entry only appears when QA is available for your project. A Project groups panel lists every group in the project with its status.
The inspection itself, such as opening a task, drawing observations on images, and handling AI suggestions, is done in Inspect and is described in the Inspect section of this guide.
Steps to create an inspection task
An inspection task is a slice of a project group's assets handed to an inspector to work through in Inspect. Creating tasks is how a project group's assets get split up and assigned so inspection can begin. You choose who inspects, how the assets are split between inspectors, the order the assets are walked, and whether the work needs a QA review afterwards.
Rules for creating tasks:
- You can only create tasks from a project group that is Collected.
- The group must still have unassigned assets. Assets already assigned to a task cannot be used again.
- No task creation or deletion can be running on that group at the time.
- The asset sort order and the Enable QA setting you choose are finalised immediately and cannot be changed later, so decide them before you click Confirm.
- If none of these are met, the Create task(s) button is disabled, and hovering it explains why (for example, "All assets are already assigned to a task" or "No project groups are eligible to create tasks").
Create tasks for a whole project group
Use this when you want to assign a project group's assets in one go.
- Open the Work module for your project.
- Click Create task(s) on the module bar at the top.
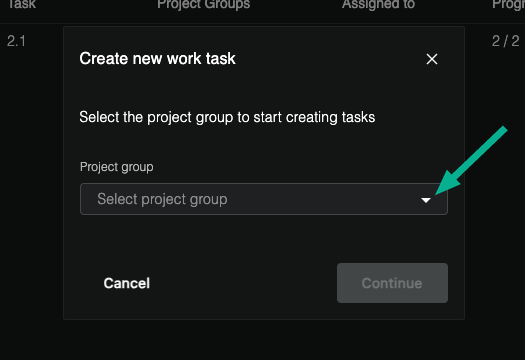
- In the Create new work task pop-up, open the Project group dropdown and select the group you want to create tasks for. Only eligible groups appear, each shown with its number and how many assets it has.
- Click Continue.
- Fill in the task details (see Fill in the task details below).
-
Click Confirm.
Create tasks from specific assets
Use this when you want to hand-pick which assets go into a task, for example to split a group between inspectors by area, or to assign only part of a group.
- Open the Work module and drill into the project group to see its assets.
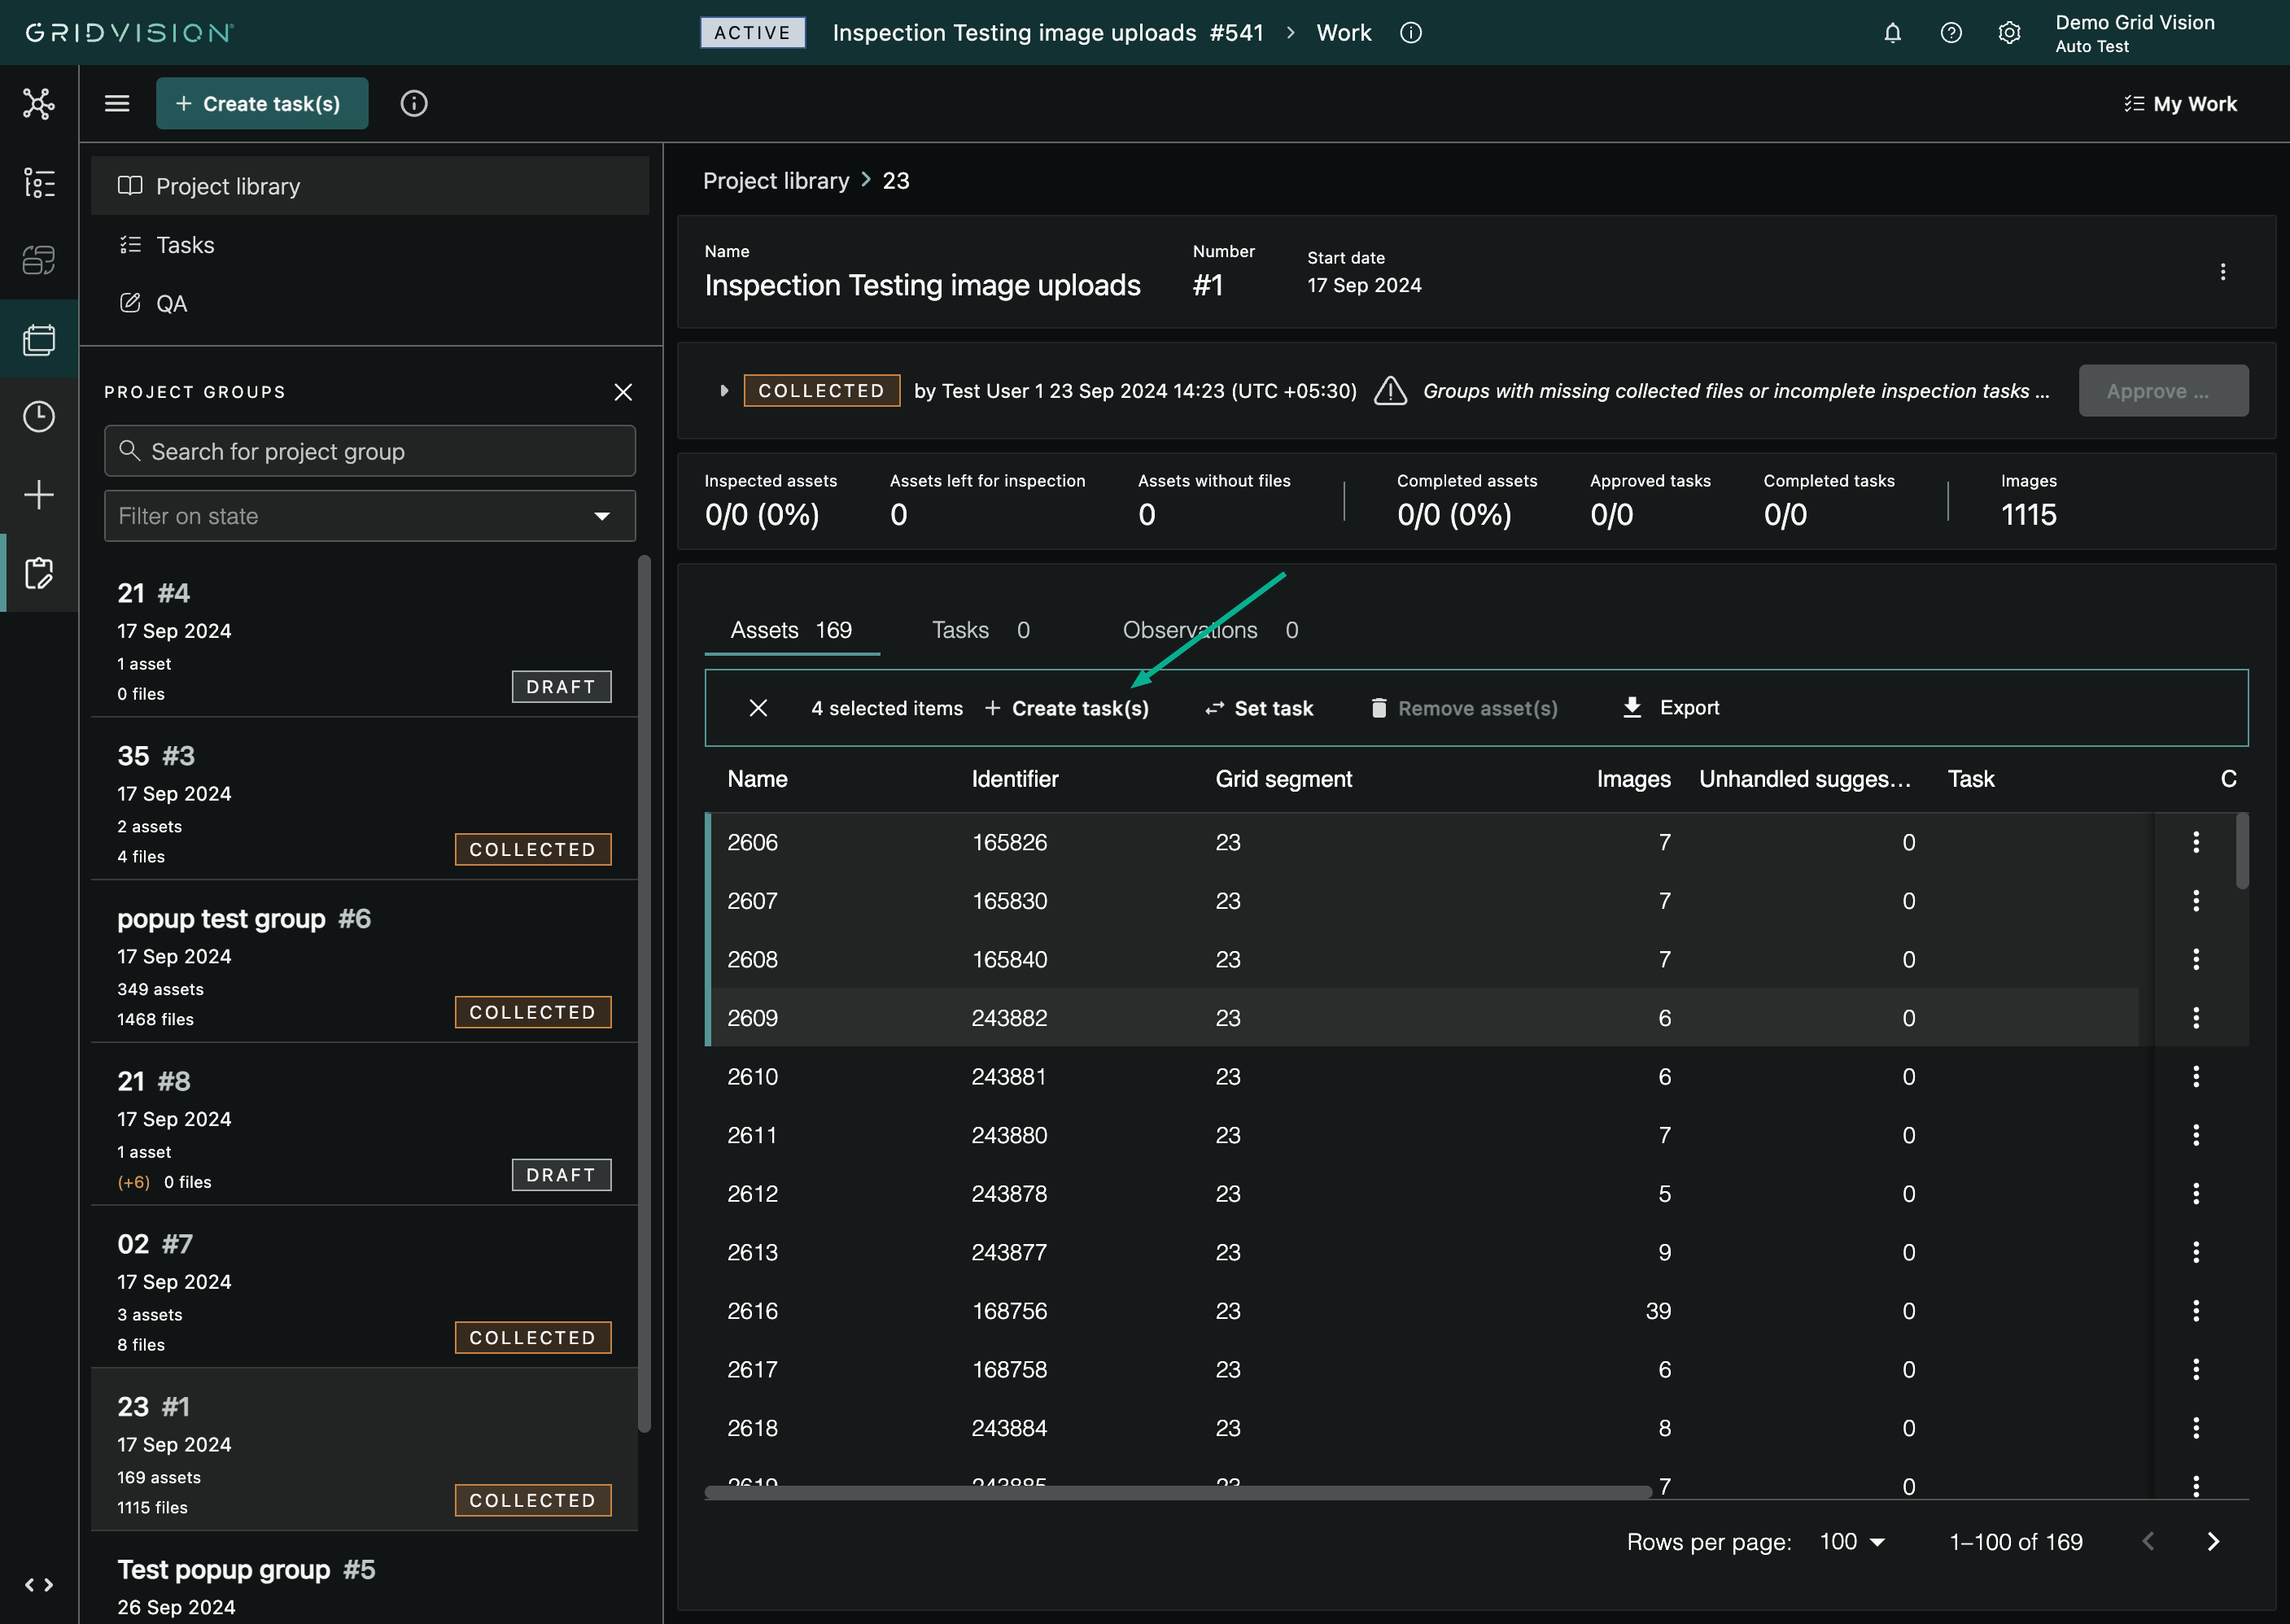
- Select the assets you want to include by clicking their rows in the grid view. Click a row to select it, and hold Ctrl (or Cmd on a Mac) to add more. The grid has no tick-box column; selecting is done by clicking rows.
- Only unassigned assets can be used. If any selected asset already belongs to a task, the Create task(s) button stays disabled and explains "Only unassigned assets can be used to create tasks".
- Click Create task(s) on the banner that appears above the grid view.
- The Create new work task pop-up opens directly on the task details, pre-filled with the assets you selected.
-
Fill in the task details (see below) and click Confirm.
Fill in the task details
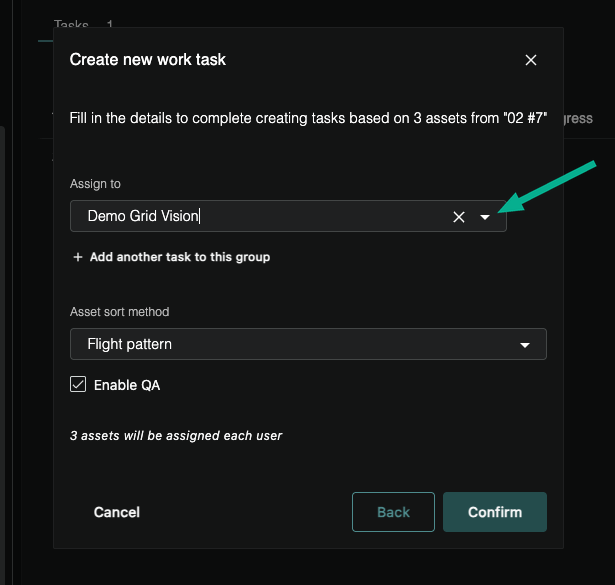
The Create new work task pop-up tells you how many assets you are working with and from which group, then lets you set the following.
- Assign to: choose the inspector who will carry out the task. Every task row needs an assignee before you can confirm.
- Add another task to this group: click this to add another Assign to row. Each row becomes its own task, and the group's assets are split evenly across the inspectors you add. Use the delete icon next to a row to remove it. You cannot add more tasks than there are assets to share.
- Asset sort method: sets the order the inspector walks the assets.
- Flight pattern: the order the assets were captured (default).
- Asset name: sorted by asset name.
- Enable QA: when QA is available for your project, this checkbox (ticked by default) decides whether the finished task must go through a quality-assurance review before it is approved. See Quality assurance below for what QA involves. This setting cannot be changed after the task is created.
- The pop-up shows a live summary of how many assets each inspector will receive.
-
Click Confirm to create the task(s). Use Cancel to close without creating anything, or Back (in the whole-group flow) to return to group selection.
After creating a task
- A confirmation appears, "Tasks created successfully", and the assets are assigned.
- The new task(s) show up in the Tasks view of the Work module, listed against the project group with the assignee, status, and progress.
- The inspector can now open the task in Inspect to begin work (see the Inspect section).
Steps to move assets between tasks
Use Set task when an asset is in the wrong task and you want to hand it to a different task, or lift it out of its current task entirely so it becomes unassigned again.
Rules for moving assets:
- An asset can only be moved while it is still open work. Set task is unavailable when the asset is Completed, or when it already has one or more observations registered on it.
- When you move several assets at once, they must all be in the same state. You cannot mix assigned and unassigned assets in one move, and every selected asset must come from the same source task.
Move a single asset
- In the Work module, open the project group and go to its grid view of assets.
- Find the asset you want to move.
-
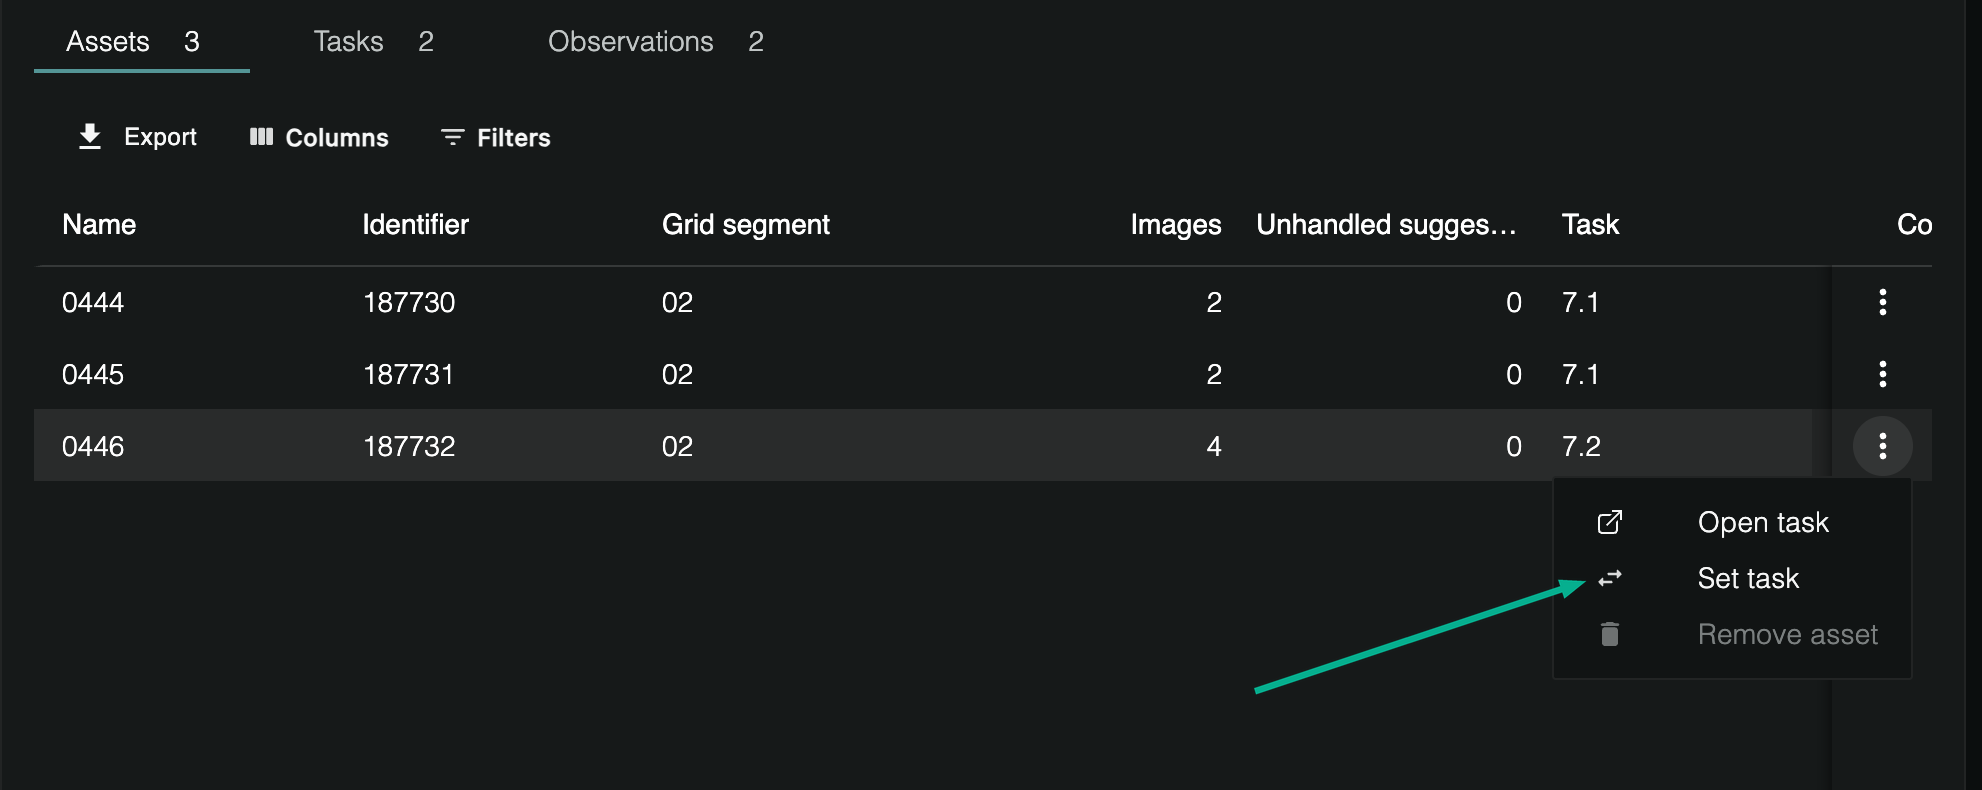
Open the row's actions menu (the ⋮ menu at the end of the row) and choose Set task.
-
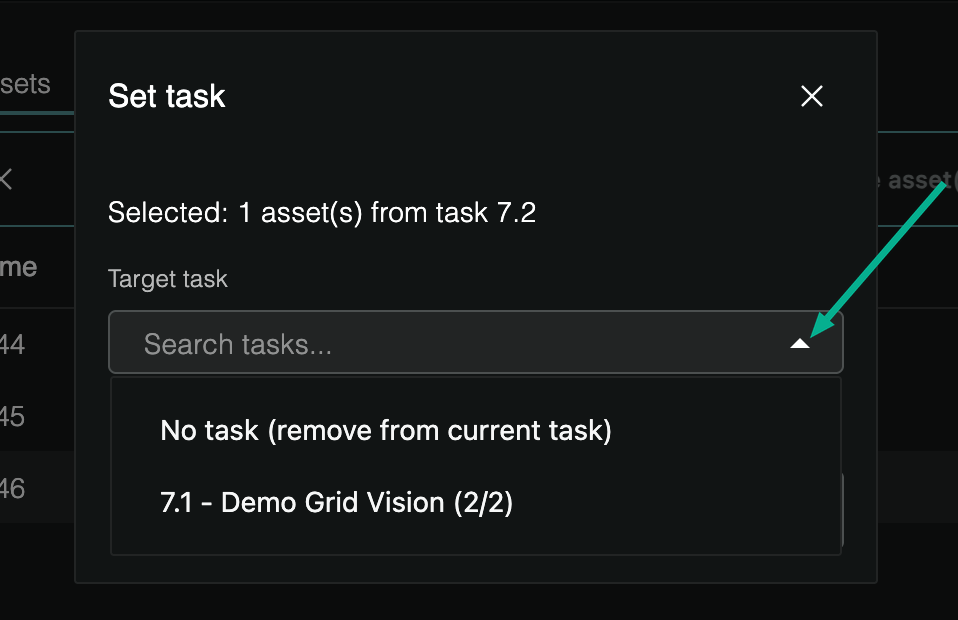
In the Set task pop-up, open the Target task field and search for the task you want to move the asset into. Each option shows the task's sequence, its assignee, and its progress.
-
To take the asset out of its current task instead of moving it to another one, choose No task (remove from current task). This option only appears when the asset already belongs to a task.
- Click Confirm. Confirm stays disabled until you pick a target task.
Move several assets at once
- In the grid view of assets, select the assets you want to move. Click a row to select it, then hold Ctrl (or Cmd on a Mac) to add more. Keep the selection to a single source task, and don't mix assigned and unassigned assets (see the rules above).
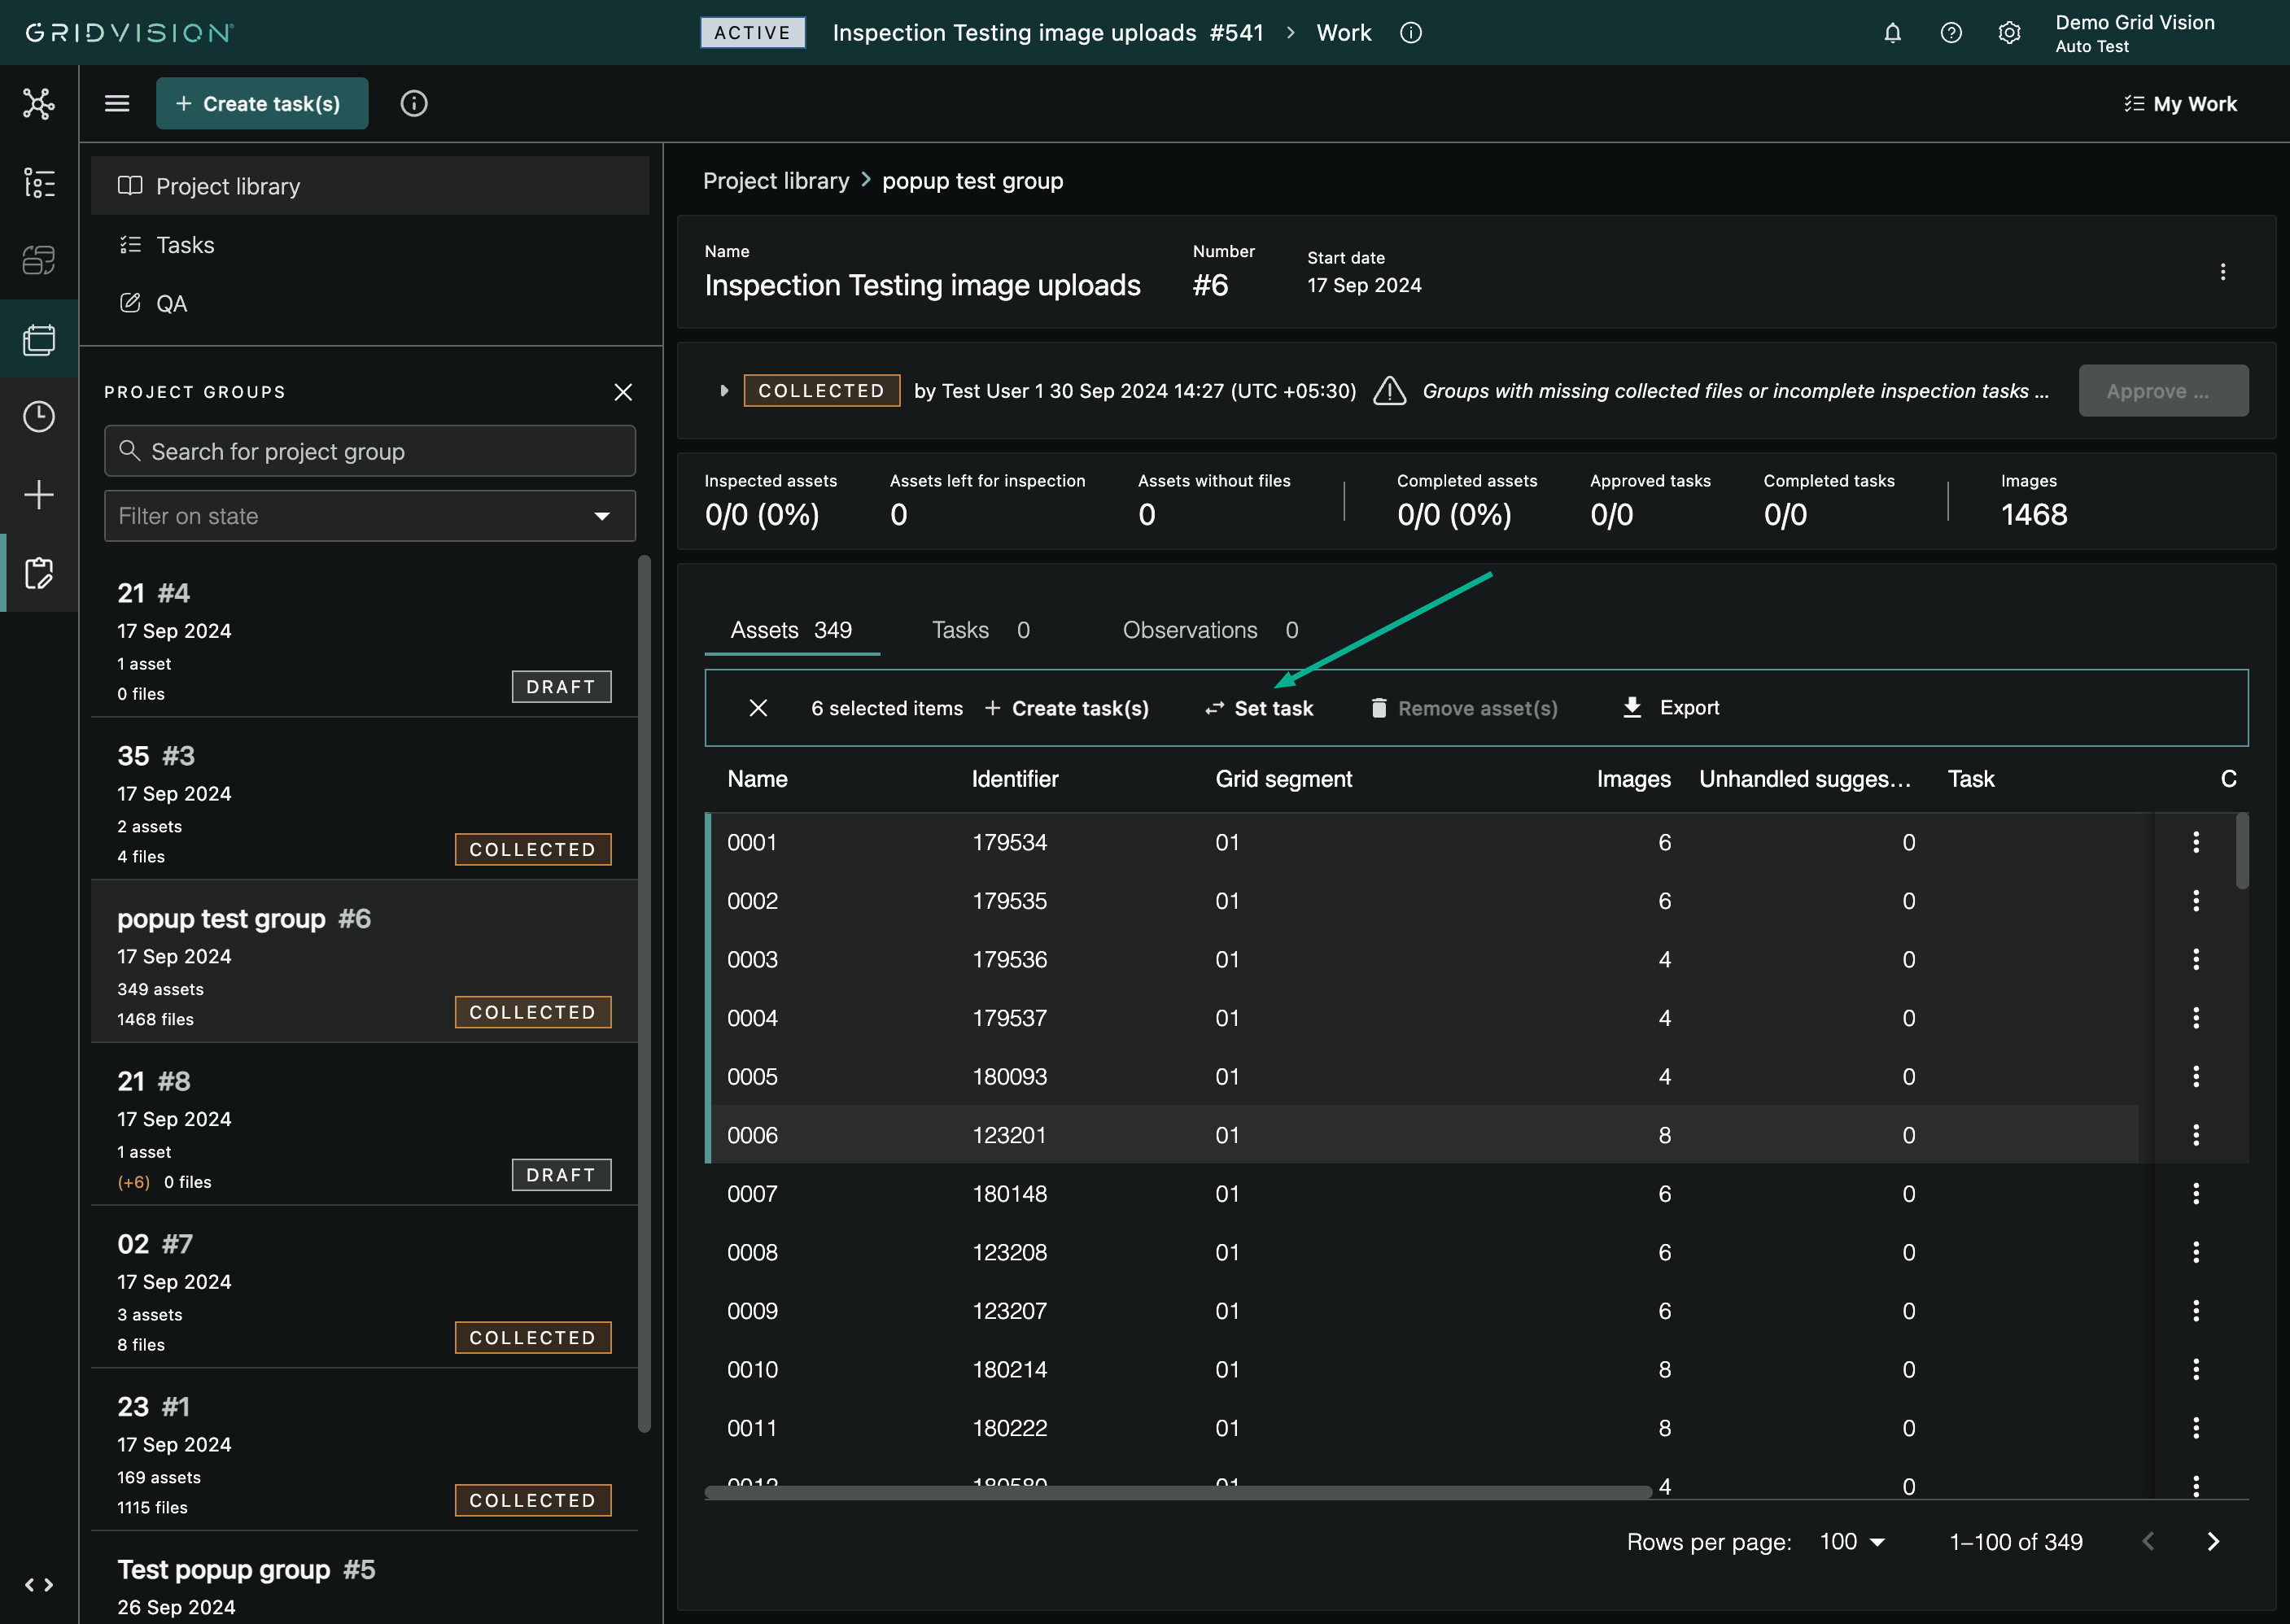
- On the banner above the grid view, click Set task.
- The pop-up opens with a summary of your selection, for example "Selected: 5 asset(s) from task 3.1", or "Selected: 5 unassigned asset(s)" if the assets have no task yet.
-
Choose the Target task (or No task (remove from current task)), then click Confirm.
-
If Set task is greyed out, hover it to see why. Common reasons are: no assets selected, one or more selected assets are Completed, one or more have observations, the selection mixes assigned and unassigned assets, or the assets come from more than one task.
Splitting work between inspectors
There are two ways to divide inspection work in the Work module, depending on where you start. You can split a group of assets across inspectors by starting from the assets and creating one task per inspector, with the assets shared out automatically; use this when you are setting up the work. You can also reassign whole tasks to a different inspector by starting from the tasks and handing existing tasks to someone else; use this when work is already underway and you need to rebalance.
Split a group of assets across several inspectors
- In the Work module, open the project group and go to its grid view of assets.
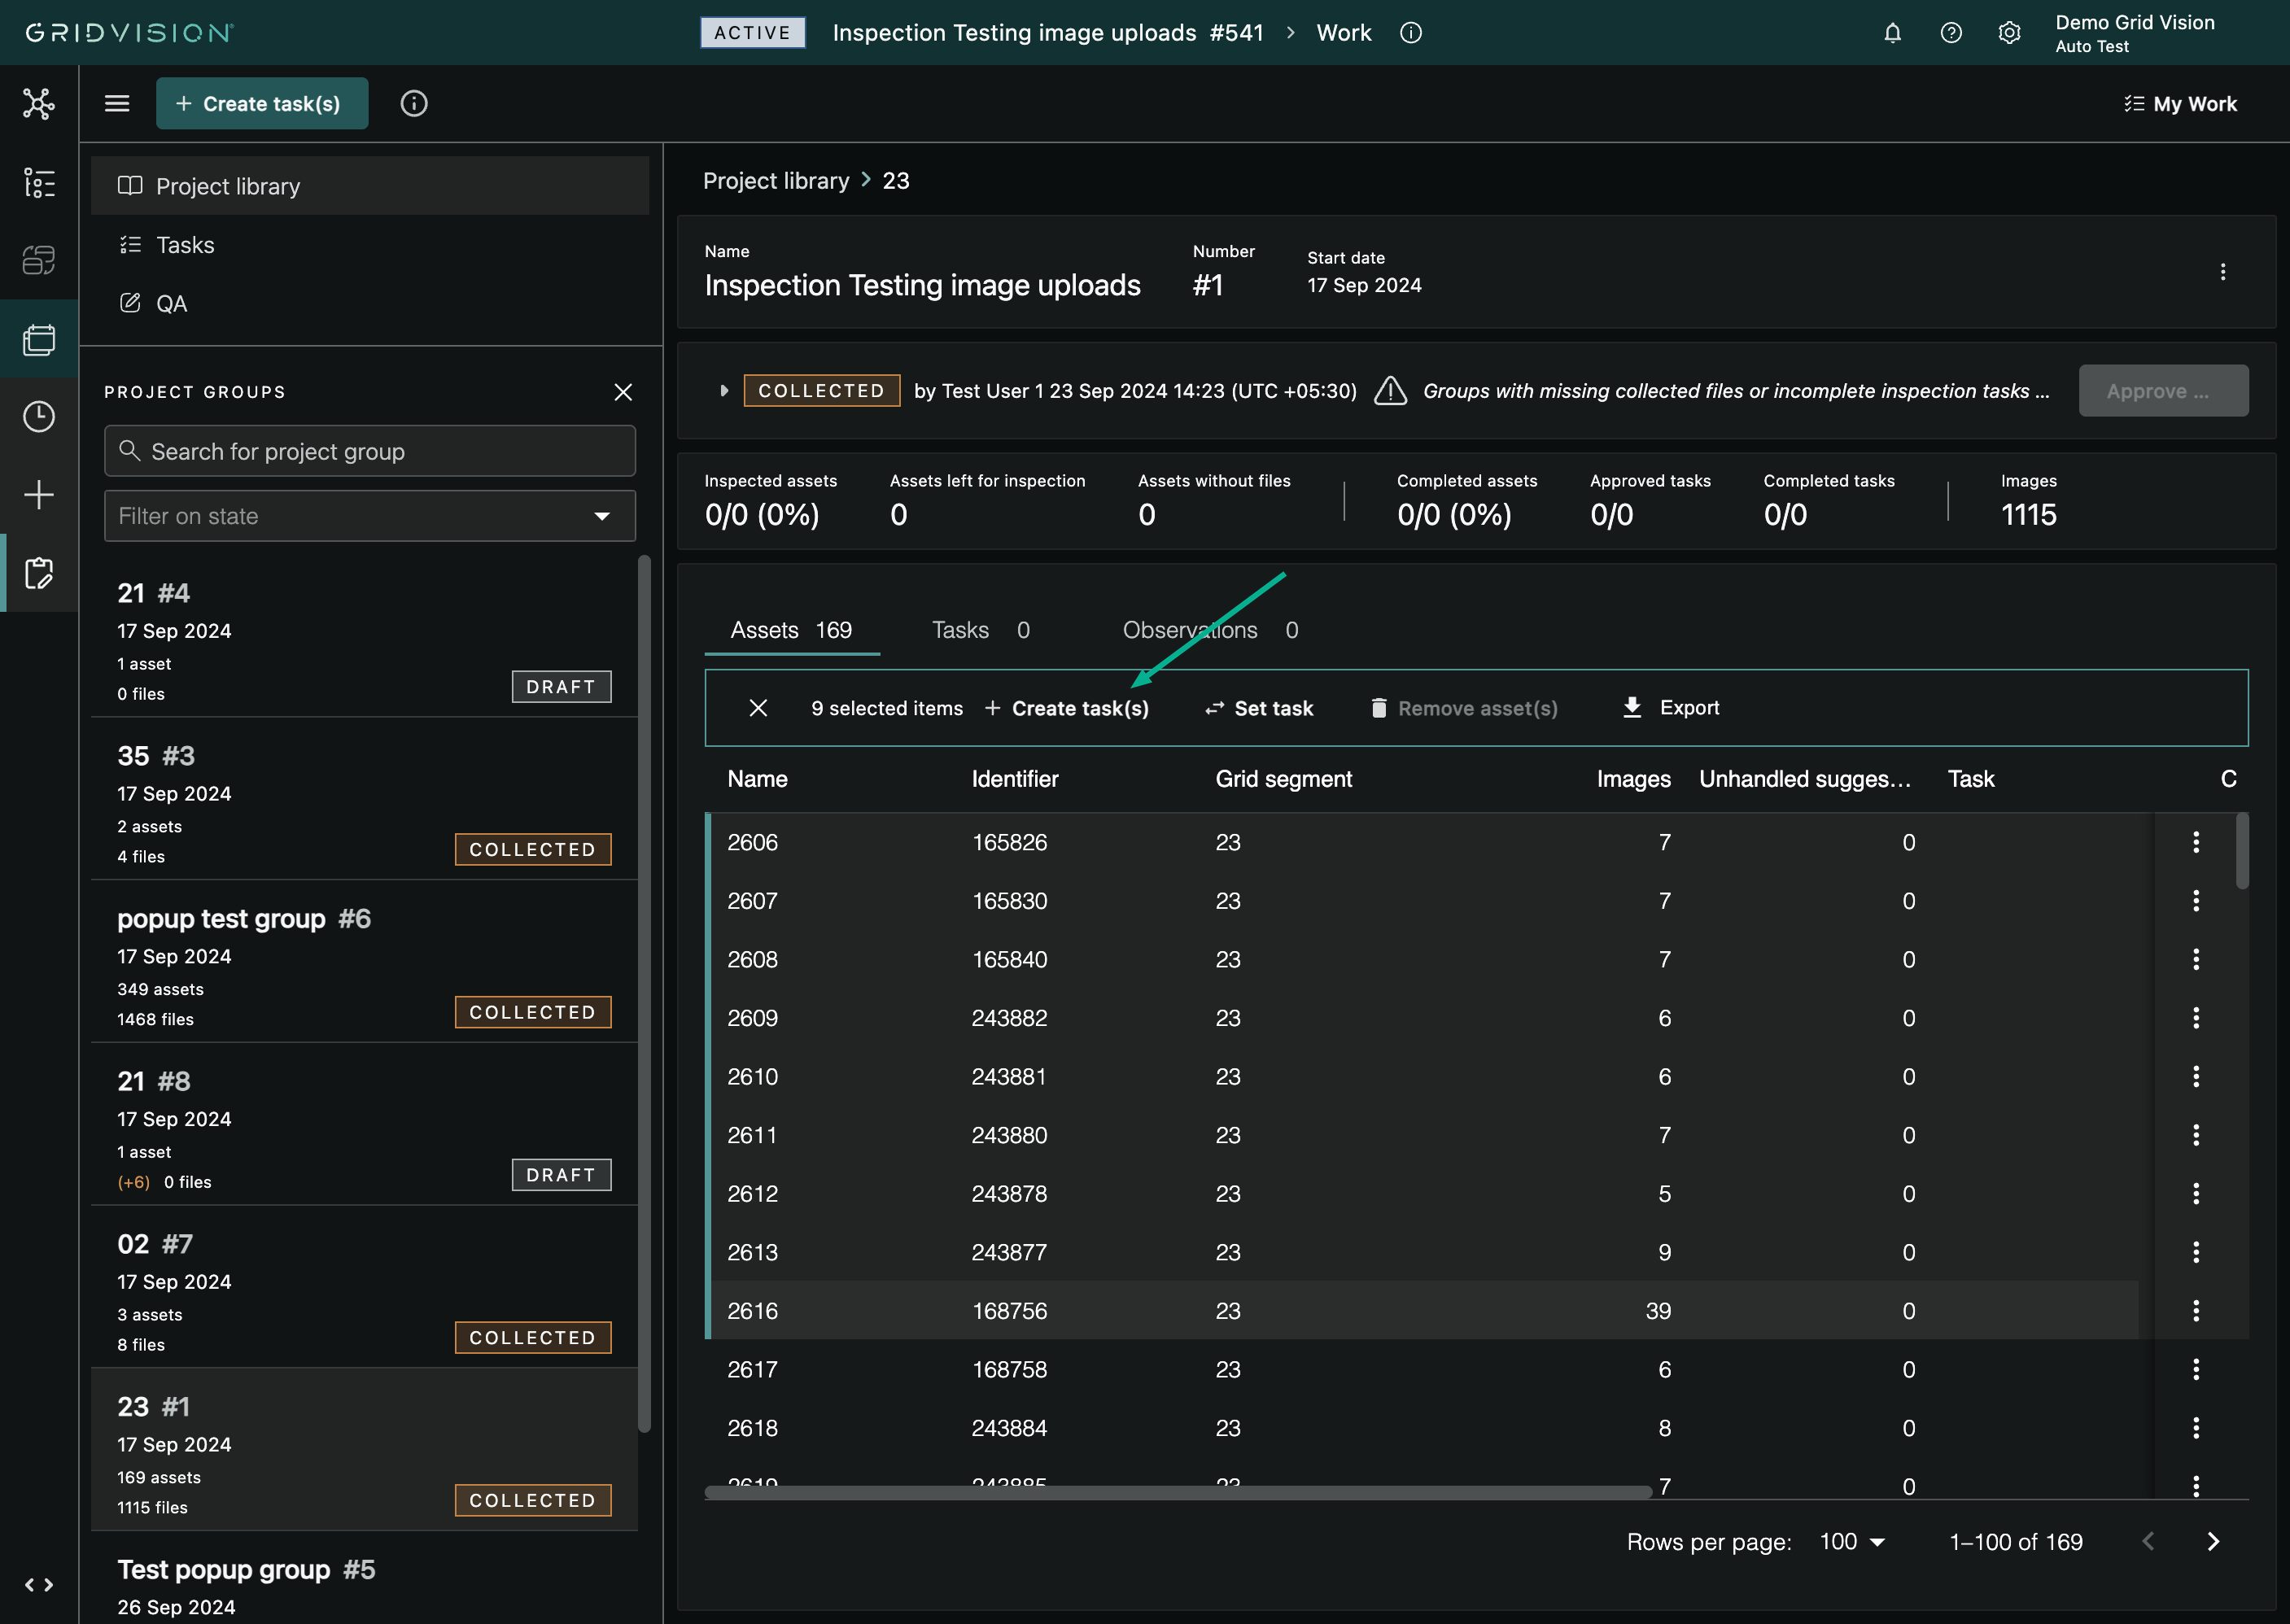
- Select the unassigned assets you want to hand out. Click a row to select it, then hold Ctrl (or Cmd on a Mac) to add more. Only unassigned assets can be used to create new tasks.
-
On the banner, click Create task(s).
-
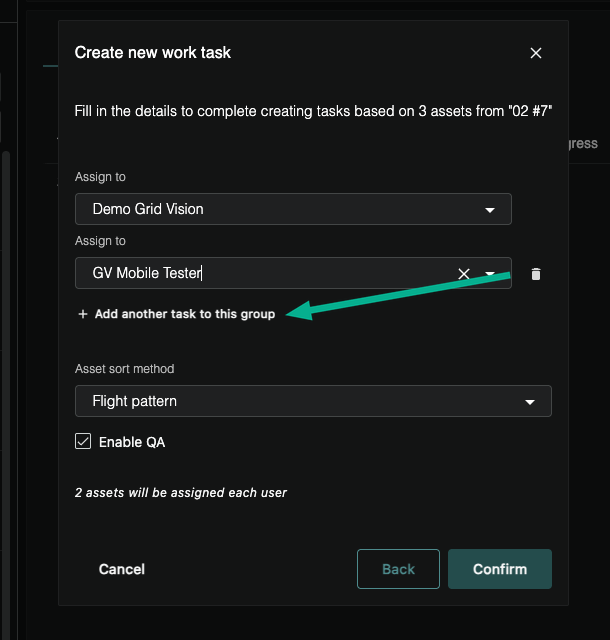
The Create new work task pop-up opens, showing how many assets you're distributing and which group they come from. Fill it in as described in Steps to create an inspection task.
- Pick the first inspector in the Assign to field, then click Add another task to this group to add a row for each additional inspector. Each row becomes its own task. You can add as many tasks as you have assets, no more.
- Choose the Asset sort method and, if quality assurance is available for the project, tick Enable QA. Both are final once the tasks are created.
-
Check the distribution line. It tells you roughly how many assets each inspector will get (for example "6 assets will be assigned each user").
-
Click Confirm. Grid Vision splits the sorted assets into equal, contiguous blocks, one task per inspector, so each person gets a comparable share of the work.
- You can also start this flow from the Create task(s) button on the module bar when a group is ready; see Steps to create an inspection task.
Reassign existing tasks to a different inspector
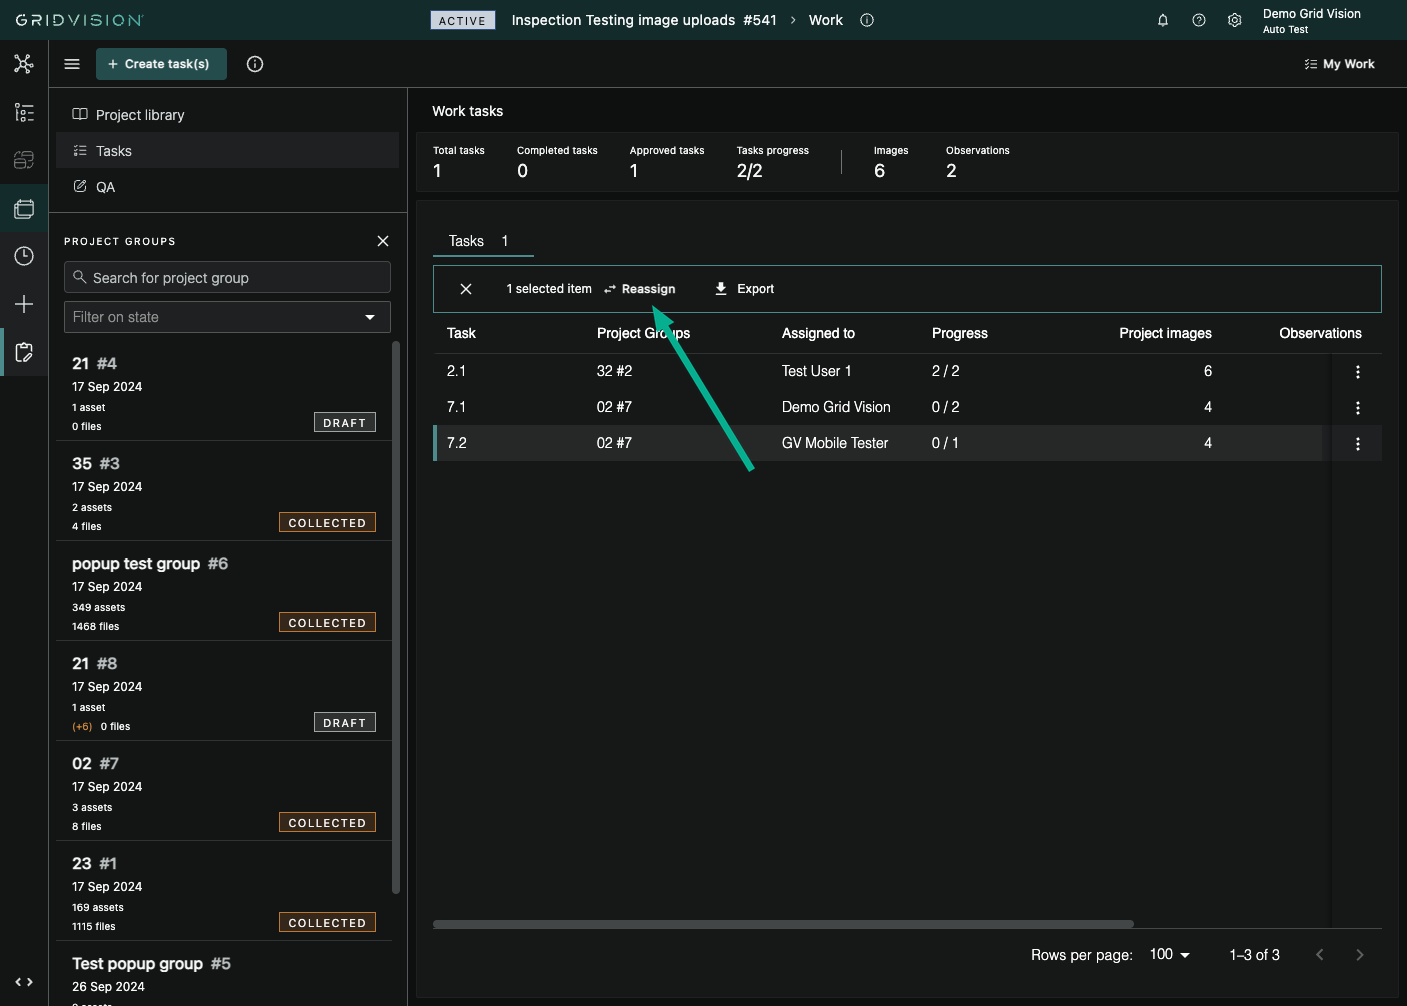
- In the Work module, open the project group and go to its grid view of tasks.
- Tick the checkboxes for the task(s) you want to hand to someone else.
-
On the banner, click Reassign.
-
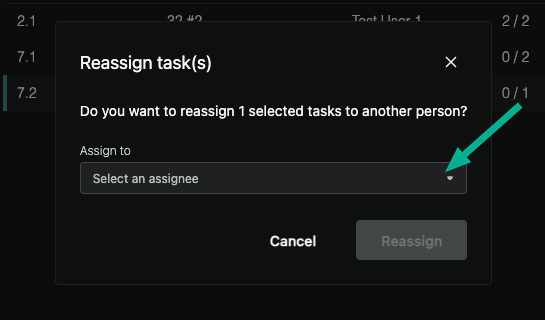
In the Reassign task(s) pop-up, confirm how many tasks you're moving, then pick the new inspector in the Assign to field.
-
Click Reassign.
- Approved tasks cannot be reassigned. If the button is disabled and your selection includes an approved task, the tooltip reads "You can't reassign already approved tasks." Deselect the approved task(s) and try again.
Quality assurance
Quality assurance (QA) is a second pair of eyes on completed inspection work. Once an inspector finishes a task, a QA reviewer goes through its observations and either approves or rejects each one, correcting anything that needs it, before the project group is finally approved and its data is published. QA is optional per task; you decide whether a task needs it when you create the task (see Steps to create an inspection task).
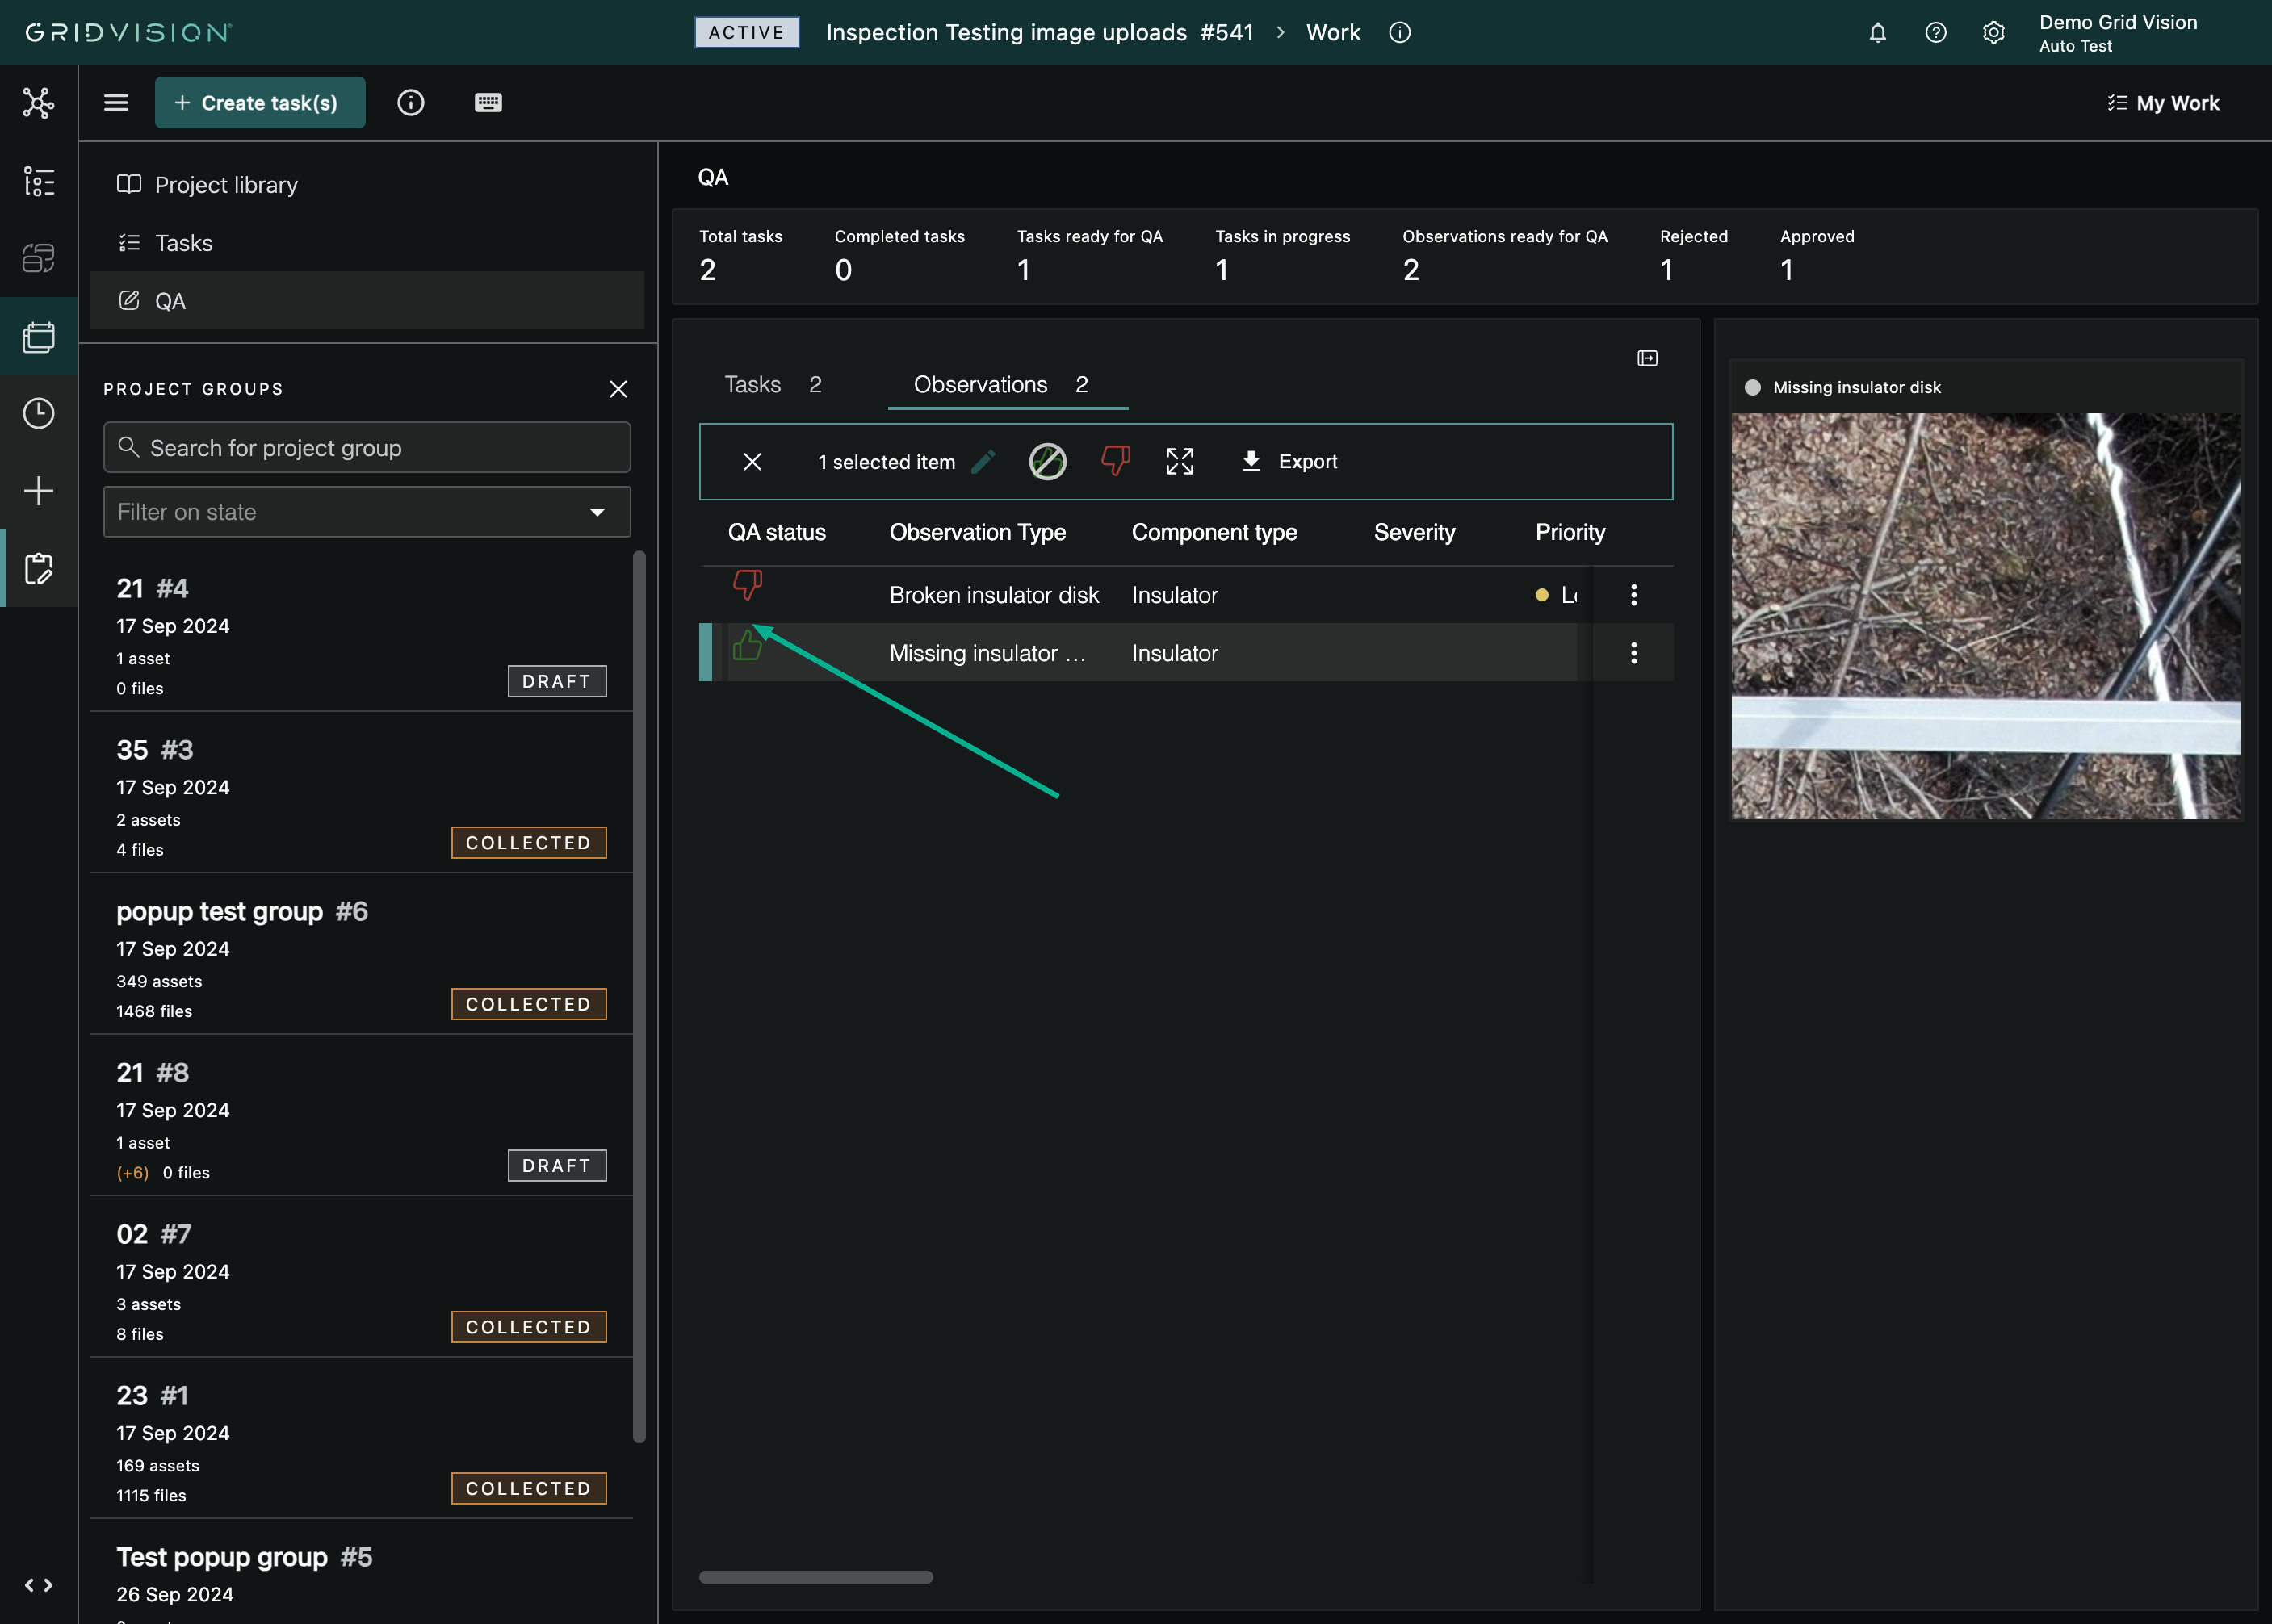
When QA is switched on for your project, the Work module gains a dedicated QA view with two tabs: Tasks (the tasks waiting for or undergoing review) and Observations (the individual findings you approve or reject).
When QA can start
A task's QA review can only begin when both of these are true.
- QA is enabled on the task. This is the Enable QA checkbox chosen at task creation. It only appears when QA is available for your project, and it cannot be changed after the task is created. A task created without QA never enters the QA workflow.
-
The task is marked Completed. The inspector must complete every asset in the task and then use Complete task on the task overview in Inspect. Until then, the task's QA status stays at Pending and QA cannot be started.
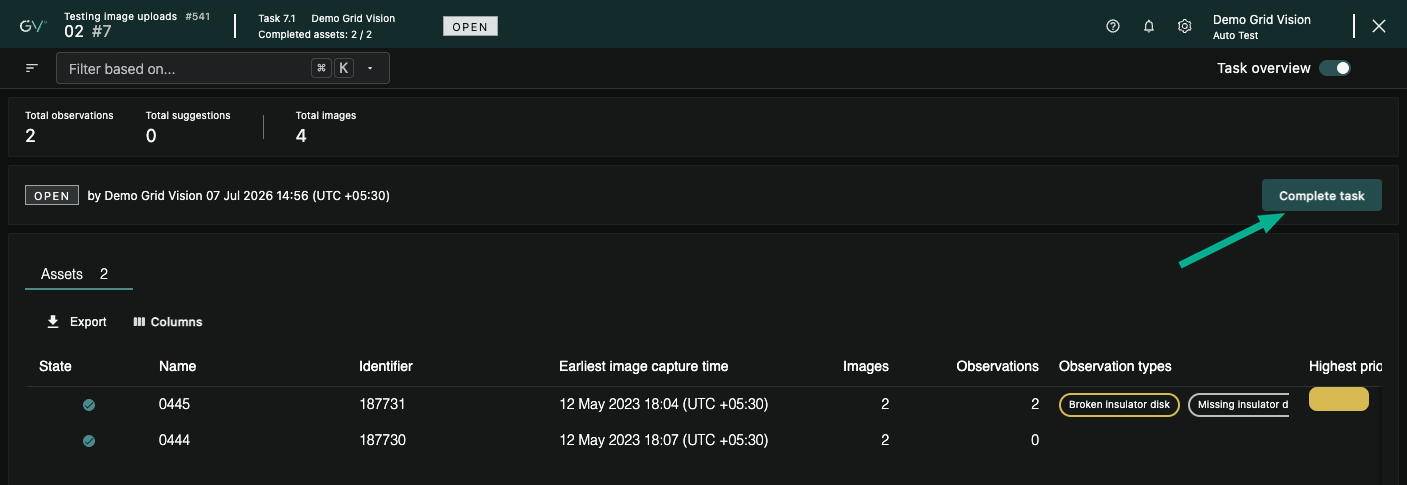
Each task carries a QA status that moves through three values.
- Pending: QA is enabled but the review has not begun.
- In progress: QA has been started and the review is underway.
- Completed: the QA review has been finished for that task.
Opening the QA view
- Open the Work module for your project.
- On the navigation pane, select QA. This entry only appears when QA is available for the project.
-
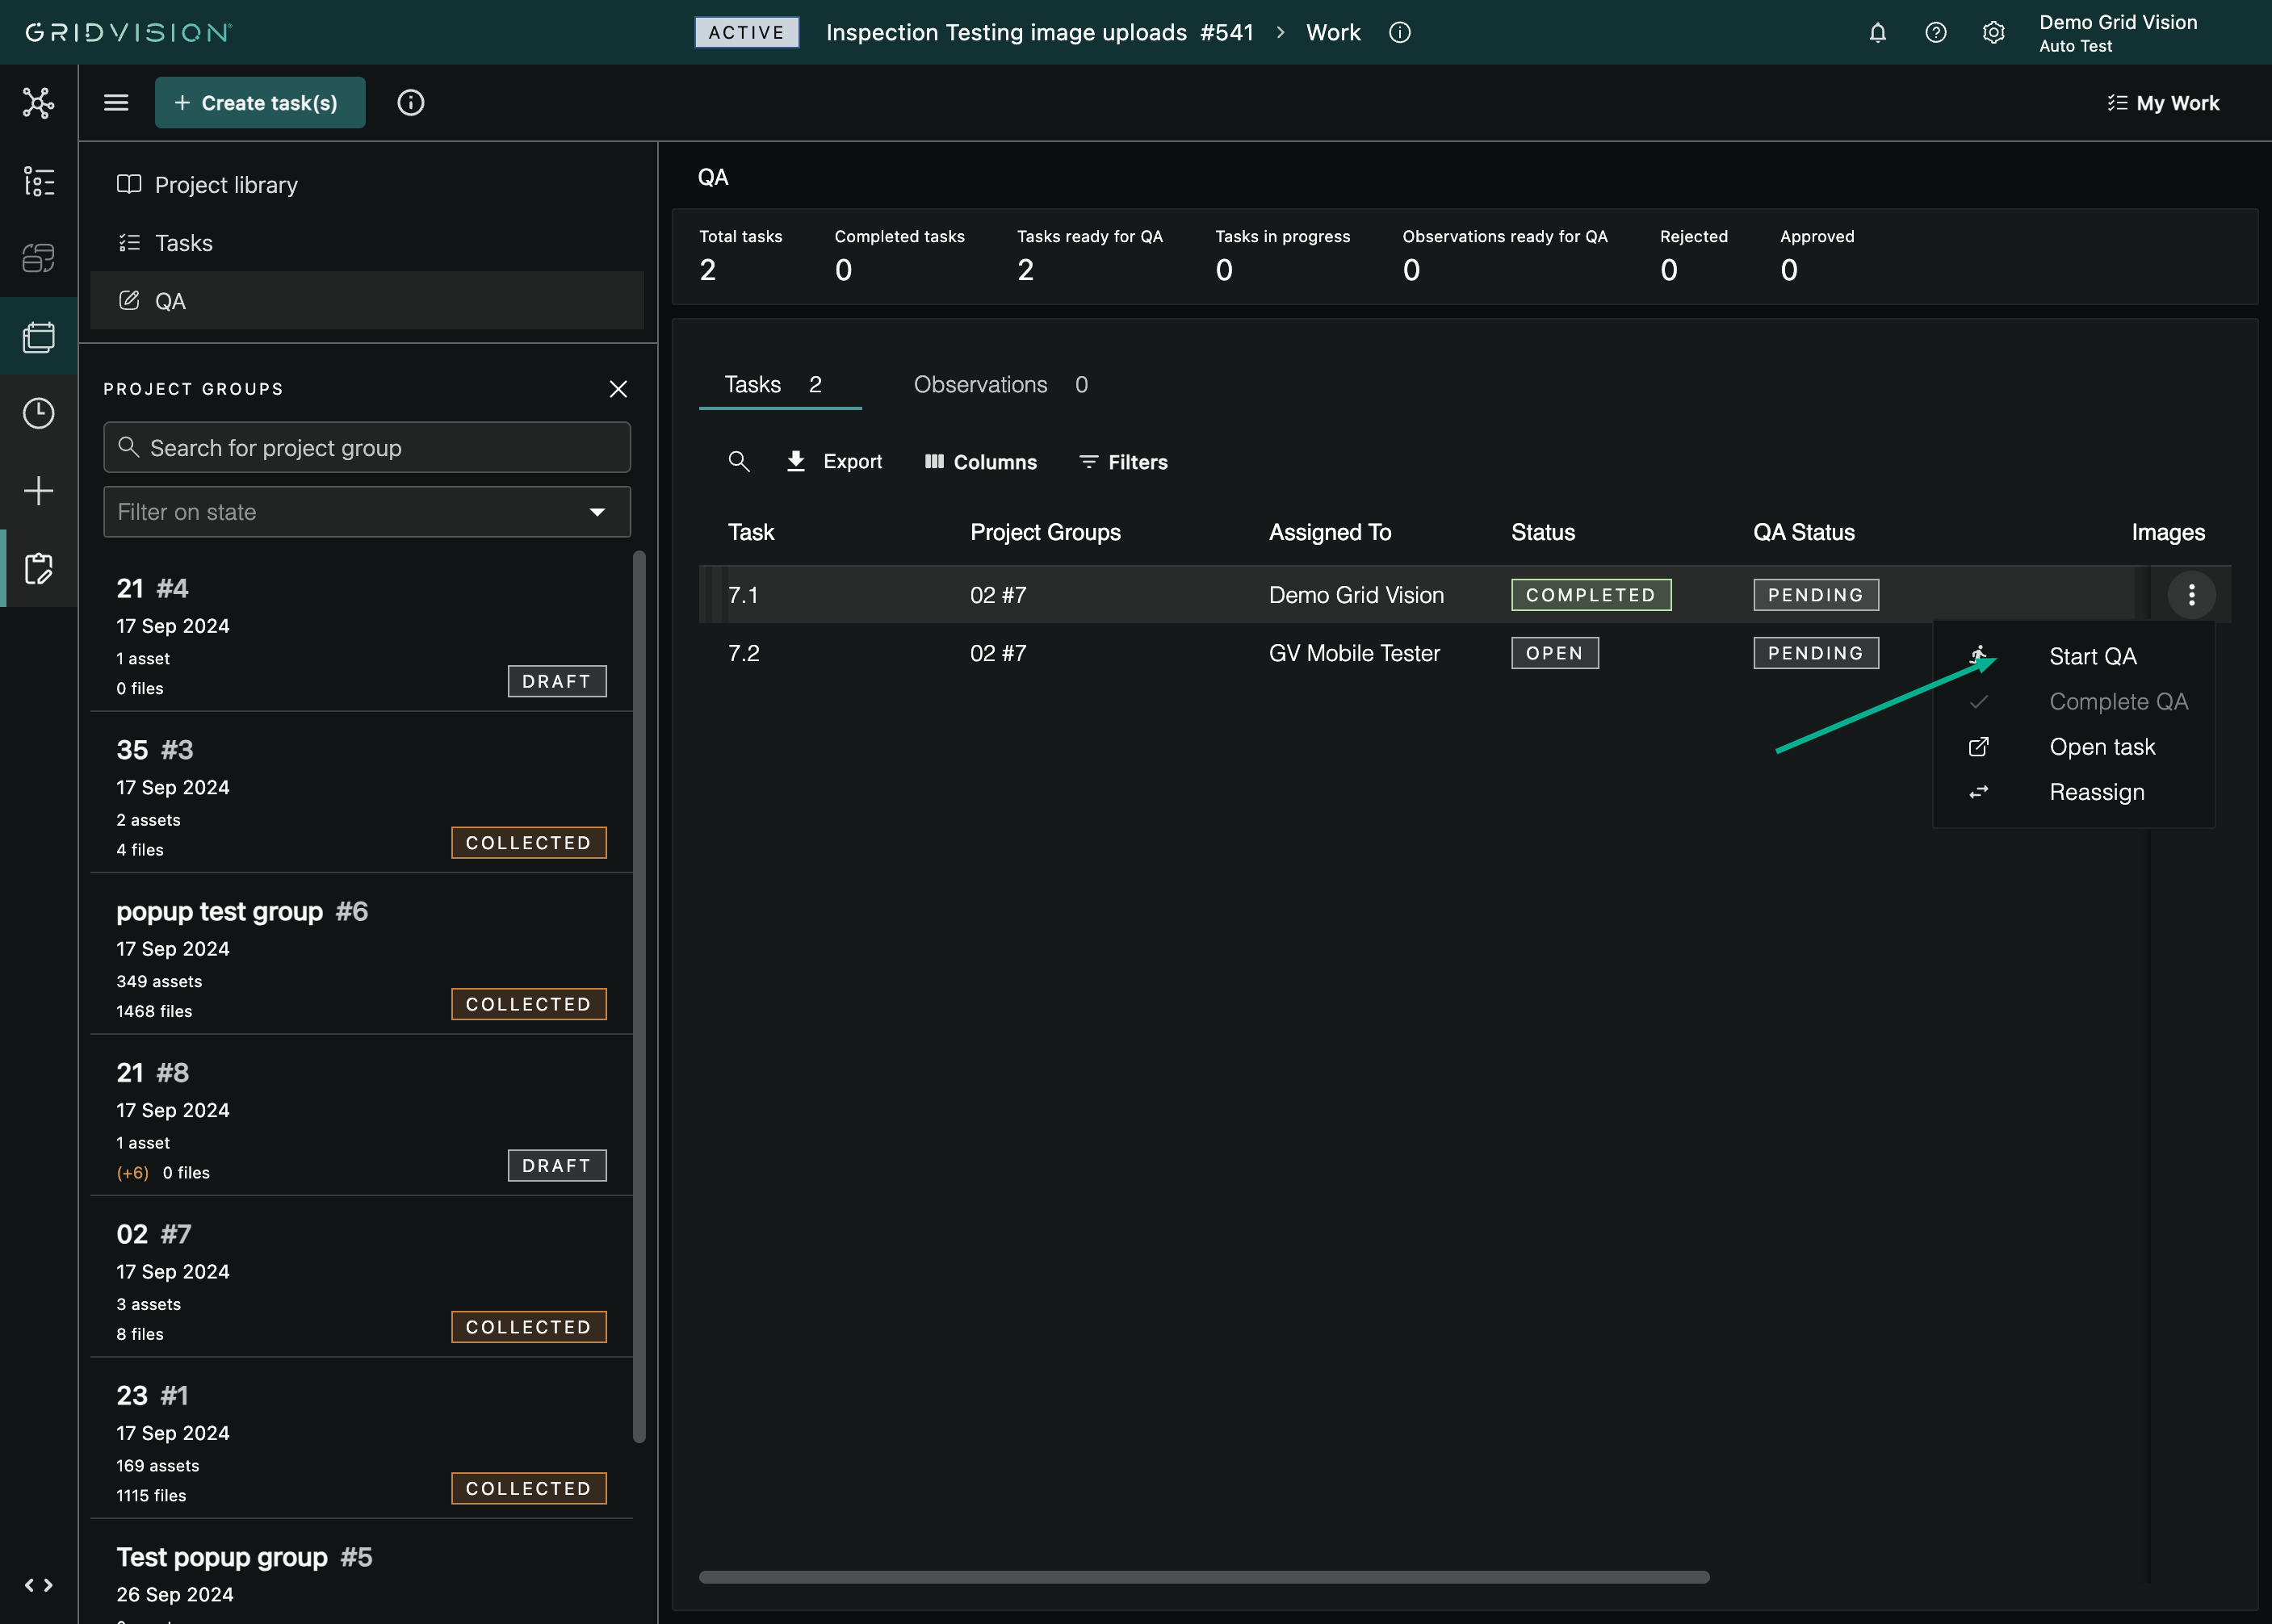
The QA view opens on the Tasks tab, listing every QA-enabled task in the project together with its status, QA status, image count, observation count, and how many observations have been approved or rejected so far. Tasks created without QA never appear here.
Starting the QA review
- On the Tasks tab, find the completed task you want to review.
- Open the task's action menu (the ⋮ menu at the end of the row).
- Select Start QA. This option is only available when the task's status is Completed and its QA status is Pending; otherwise it is greyed out.
- The task's QA status changes to In progress, and its observations become available on the Observations tab.
Performing a QA review
The Observations tab lists all the observations from tasks whose QA is in progress. This is where you check each finding.
- Open the Observations tab. If no task currently has QA in progress, you'll see "No tasks with QA in progress" instead; start QA on a completed task first.
- Work down the list of observations. For each one, use the row's action menu (or the buttons that appear when you select observations) to give a verdict.
- Approve observation: the observation is correct and should be kept. A green thumbs-up appears in the QA status column.
- Reject observation: the observation is wrong and should not be published. A red thumbs-down appears in the QA status column. Rejected observations are removed when you complete QA for the task.
- Edit observation: open the observation to correct it (for example fix its type or other properties) before approving. Save your changes and then give it a verdict.
- To review the image evidence, open Open Observation Viewer from the row, or use the image panel toggle to show the image alongside the list. Where an observation has more than one image, its proofs are grouped into a single card you can page through; see Multi-image observations in the Inspect section.
- To act on several observations at once, tick their checkboxes and use the approve, reject, or edit actions on the banner. Batch editing is only available when the selected observations share the same observation type; if they differ, edit is disabled and explains why.
-
Approving an already-approved observation (or rejecting an already-rejected one) clears that verdict, so you can undo a decision by choosing the same action again. The menu labels change to Clear approval and Clear rejection to reflect this.
Completing QA for a task
When you have given every observation in a task a verdict, complete QA for it.
- Go back to the Tasks tab.
- Open the task's action menu and select Complete QA.
- A confirmation pop-up warns that completing QA is irreversible; observations can still be modified until the project group is approved, but the QA-complete step itself cannot be undone. Confirm to proceed.
- Any rejected observations are removed, and the task's QA status changes to Completed.
Approving the project group after QA
Completing QA on the individual tasks does not publish anything on its own. The final step is approving the whole project group, once every task in it is completed and, where QA applies, reviewed.
- Open the project group in the Work module.
- Use Approve group on the group's status line. It is only enabled once all tasks are completed and every asset has images and has been inspected; hovering it while disabled explains what is still outstanding.
- Confirm the approval.
A project group cannot be edited after it has been approved. Approval publishes the group's observations to everyone with access to the participant, so the data must be trusted before you approve. Once approved, the group's data becomes available in Report and Asset Explorer.